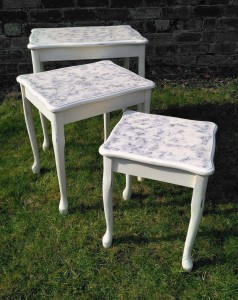
These tables were posted online in the very first week of our new venture and were bought by a lovely lady who I will refer to as “T” to protect her privacy!
She loved them so much that she commissioned a large coffee table and a mirror for over her fireplace; with a similar feel, but not slavishly matching.
I choose every piece we refinish for it’s shape, not it’s condition; and I think long and hard about what I think it wants.
“T” was happy to trust my judgement, stipulating only that the pieces be the same palest cream and grey colourway as her tables above and that they would suit her preferred style of Shabby Chic with a French Flavour – an easy creative leap for me!
The original nest of tables –above left- was influenced by a memory of a table I saw in a Brocante in France with a white marble top. I didn’t slavishly copy a marble piece (though I can emulate marble, ask Trevor!) but I liked the loose and random figuring I achieved on these.
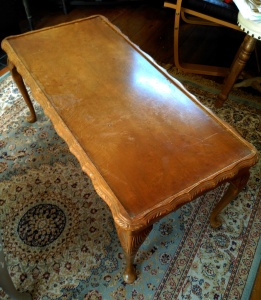 Finding the coffee table wasn’t difficult; there are a few of these carved 1950’s reproduction ones about that have a flavour falling between English Queen Anne & French Provincial/Country style & I knew exactly what I wanted . The top on this one had treacly varnish that had flaked off everywhere and took a fair bit of preparation as we don’t send stuff off to be caustically, chemically stripped!
 That, folks, is how to destroy all the joints, dissolve any important ancient glue and split any weak areas wide open.
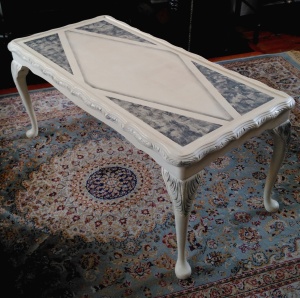
I had seen tables with quartered and diamond lozenge inlay I liked, so I used Frogtape to section off the design- https://www.frogtape.co.uk/
Accept NO substitute for any masking task. Really.
Sourcing the mirror was tougher. “T” had a fairly narrow chimney breast with a light switch toward one side, so finding something narrow enough to suit, but tall and dramatic enough to make a statement was tough. Over mantle (over mantel) mirrors have to have presence.
We were lucky enough to source a 19thc French one, but before the antique purists start screaming at me, it was in TERRIBLE condition, with black gloss paint, bits of the bead and reed trim loose and missing and deep gouges to the thickest part of the frame.
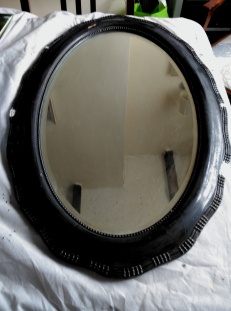
So, we were perfectly happy to repaint and as the frame had originally been hand made in a number of sections, joined together,I replaced the missing bead and reed edging using a modelling medium; then I refinished it with a sectional design, polished it smooth with natural waxes and buffed it to a soft sheen like the other pieces. I see lots of matte chalk painted finishes around & they are very pretty, but not robust, sadly.
I didn’t attempt to replace all the little beads immediately adjacant to the glass, and I have left the wear and foxing of the mirror as found; keeping it’s character and charm.
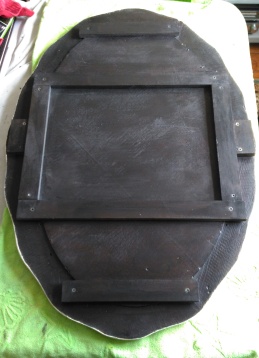
The back was in a bad state, with only a thin oval of badly fitting ply holding in the heavy original mirror. It wasn’t even safe to hang in that state. So, to avoid the risk of removing the back and the possibility of damaging the mirror whilst fitting a new shaped piece, Trev decided to make a custom inset square frame and panels from 1/2 inch ply and fit these across top and bottom to take the weight.
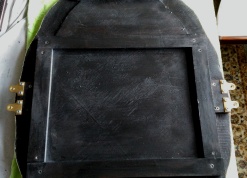
This also meant that we could mount two small blocks on each side, also slightly inset; designed to carry two good, strong brass mirror plate fixings; leaving enough room to insert a screwdriver when hanging of course!
A cord or chain would not be appropriate, it’s too heavy for hanging that way, but our solution allows the mirror to sit flat against the wall. The back was painted with a grey wash so any visible mount will disappear into the shadow behind.
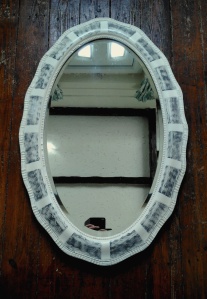
We also painted a little corner shelf to complete the look. It all looks fantastic in “T’s” pale, pretty living room with it’s light wood floor, palest grey walls and cottagey printed white, lavender and pastel green curtains.


Great DIYs! Thanks for the recent like on my blog 🙂 Follow for follow?
LikeLike
What a great effort on the mirror!
It really does look amazing, well done!!
LikeLike
Thanks ; Hope you are OK? haven’t had time to swing by everyone’s blogs for a while .
It’s all been reactive, not proactive!
LikeLiked by 1 person
All good here thanks Gill. Been very busy starting the business and recovering from the walk. I had promised a complete write up of the walk for post number 500 on the blog but I still haven’t gotten round to it!!
One day I shall organise myself to relax for a day then write for a day. Easy…..
LikeLiked by 1 person
Look forward to seeing that
LikeLiked by 1 person
🙂
LikeLiked by 1 person
You’ve done a wonderful job. Great to read about it, particularly as I didn’t realise you offered this sort of work. Noted for future!
LikeLiked by 1 person
It was so good to read your blog, welcome back.
LikeLiked by 1 person
Ah, now, that’s the spirit! Great stuff to share. Very very clever effects, and I love how you and Trevor work as a team to bring out the best from a derelict piece like the mirror. Giving these pieces a new lease on life is splendid.
LikeLiked by 1 person
Really nice. Antiques in great shape are one thing. But as soon as the number of flaws passes a certain point of no return, they are harder to love. You are saving the marginal stuff and making it great.
LikeLiked by 1 person
Thanks, that’s my absolute aim
LikeLike
Looks lovely, Gill. As always
LikeLike